How to Create a CPC Campaign
Author: CPAlead
Updated Sunday, August 27, 2017 at 1:30 PM CDT

CPC campaigns allow advertisers to drive traffic immediately to mobile CPI offers and CPA offers without having to wait for traffic. Publishers tend to prefer CPC campaigns on their monetization tools because they are guaranteed to be paid for the performance of their traffic on a per click basis. As a result, CPC campaigns in CPAlead get more traffic and higher quality traffic as publishers prefer to run these types of campaigns.
Being that this is the most attractive option to high quality publishers, CPC is also the most attractive option for frauders. At CPAlead we have very little occurrences of click fraud as every click is scrutinized for quality with over 20 different quality checks. We would love to disclose to our advertisers every single type of check we do to eliminate click fraud, but then we would also be informing publishers with bad intentions what those fraud checks are. With that said, we wont be sharing any of our fraud prevention measures.
On top of fraud prevention, we also provide CPC advertisers with the option to disable any traffic source they don't like and even limit new traffic sources to the amount of traffic they can send. This helps CPC advertisers rest easy at night knowing that an undesirable traffic source cannot deplete their entire budget.
Creating a CPC campaign can take less than one minute, and the best part is, setting up a postback is NOT required.
Become a CPAlead CPC Advertiser
To create a CPC campaign, you will need to create a CPAlead advertiser account. If you already have a CPAlead publisher account, this step is not required. To sign up for CPAlead, please Signup as a CPC Advertiser.
Once your account has been created, log into your CPAlead account as an advertiser.
Creating a CPC Campaign
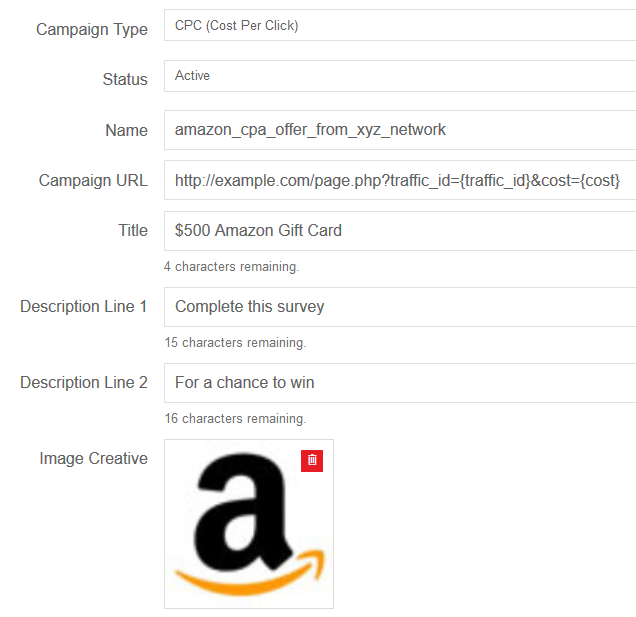
Now that you're logged into your CPAlead Advertiser account, you can start creating your CPC campaign. In the left menu, click on the CAMPAIGNS option then select CREATE NEW CAMPAIGN. You will then arrive at the campaign creation page as seen below.

Campaign Type
The first option you will be presented with is selecting the campaign type. From the drop down menu, select CPC. If you wish to setup a CPA or CPI campaign instead and only pay for installs and conversions, click here for instructions on how to create a CPA campaign or click here for instructions on how to create a CPI offer. The downside to setting up your offer as a CPA campaign or CPI offer is that it's harder to receive traffic.
Status
Select the status of your campaign. As soon as it is approved by our staff, this is the status it will go to. We recommend leaving the status as ACTIVE so you start receiving traffic immediately upon approval.Name This name is for your own reference only. No one will see this name except for you, so feel free to make it whatever you would like.
Campaign URL
When someone clicks on your campaign, this is the URL they will be redirected to. This is usually the CPA or CPI offer URL from the affiliate network you received this offer from. For advanced users, if you are using a 3rd party tracking platform such as a Voluum, you can use our macro {cost} to report the amount you are charged per click and the macro {traffic_id} to track the traffic source of the click. We also recently added {publisher_id} so you can track the publisher ID the traffic came from. Note: One publisher may have 10 or more traffic IDs as we create a new traffic ID for each tool a publisher creates to serve ads.
Here is an example of how you may use macros: http://example.com/page.php?subid1={traffic_id}&subid2={publisher_id}&cost={cost}
Title
This is the headline and title for your campaign. The goal here is to create a title that will attract clicks. Keep in mind that your CPC campaign will be displayed alongside other CPC campaigns, so you want yours to stand out. For instance, instead of 'Amazon' for a title, you can use '$500 Amazon Gift Card' instead. This will make your offer more attractive to visitors and traffic.
Description Line 1 and Description Line 2
The description describes the offer. So in the example above, we could say on Description Line 1 'Complete this survey' and on Description Line 2 'for a chance to win'. The description is displayed in a continuous format, just like campaigns from Google Adwords.
Image Creative
This image will be displayed alongside the Title and Description of your campaign. To upload and image, simply drag and drop your image onto this square. You will then have the option to zoom in or zoom out to crop your image. We accept almost any image size. Make sure your image is attractive enough to interest visitors and traffic who see your campaign. The goal here is to make people want to click on your campaign. The better the image, title, and description, the more clicks you will receive. Below are some examples of how your CPA offer could appear on a publisher's monetization tool:
Examples of CPC Offers
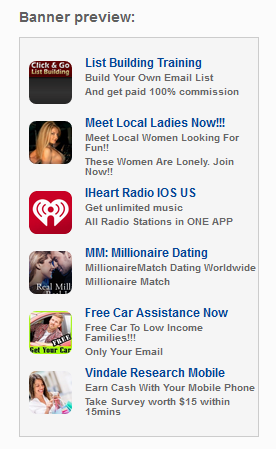
Below are a few examples of how CPA offers are displayed on CPAlead Publisher Monetization Tools. Here you will see banner ads and offer wall examples. (Not pictured are interstitials, pop unders, push ups, content lockers, direct promotion links, and superlinks)
Banner Example Showing 6 CPC Offers

Banner Example Showing 1 CPC Offer

Please note that CPC offers do NOT show up on virtual currency offerwalls. CPC offers only appear on monetization tools that ask the visitor to choose 1 ad option from a list and on non-incentive tools such as banners and interstitials.
GEO Targeting Type
Here you can select the type of countries you would like to target for your campaign. You can select by country, continent, or price tier with tier 3 being the lowest cost at only 3 cents per click.
Country Targeting
Based on the GEO Targeting Type you selected above, you will see a list of countries your campaigns will be shown to. Feel free to add or remove any country from this list.
Device Targeting
These are the device types that your campaign will appear on. Some advertisers choose to create a separate campaign for each device option, but you're welcome to select all 3 devices which are Desktop, Android, and iOS for your campaign.
Run Campaign
This allows you to choose the time of day your campaign will run. By default your campaign will run all hours of the day (24 hours).
Max Bid Price
This is where you set the maximum amount you are will to pay per click. In many instances, the price you are charged for the click will be less than your max bid. Certain tools like the pop under will only charge you 6% of your bid price per pop. If there are any tools you don't want your campaign displayed on, you can disable them as we discuss below.
Daily Budget
This is the maximum amount you will pay per day. We recommend testing our traffic first. If you're happy with the result, then increase the amount.
Managing CPC Traffic Sources
While we automatically remove and prevent bad / fraudulent traffic sources, you may find some traffic sources are not compatible with the campaign you are promoting.
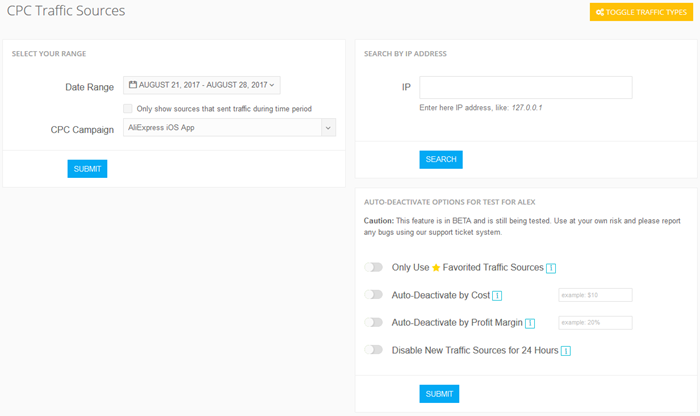
To manage your CPC sources, go to the SOURCES option in the left menu and then select CPC Sources.
Here is a full video tutorial on how to manage your CPC traffic sources. We recommend watching the video, then continue reading.
Link to Video
On this page, select the CPC campaign you would like to manage traffic sources for.
Once you have selected your campaign, you will see a list of traffic sources that have sent clicks to your campaign. You can disable any traffic source any time, and you can even limit traffic sources automatically using any of these three options (recommended for Advanced Users only).

Only Use Favorite Traffic Sources
If enabled, your campaign will only run on your favorite traffic sources, this is also known as a whitelist. To favorite a traffic source, click on the star icon next to the traffic ID. Keep in mind that traffic source numbers are created from a combination of your campaign ID, their publisher ID, and the tool that they use to promote your offer. This means when you favorite a traffic source, you will actually favorite the publisher and all traffic IDs associated with them. If you are running a new campaign and you choose to only use your favorite traffic sources, you will see new traffic IDs but rest assured these are new traffic IDs that are tied to your favorite publishers.
Auto-Deactivate by Cost
This option will automatically deactivate traffic sources that go above the cost you specify starting from the time this feature is enabled. For instance, if you set this value to $10, this means any traffic source that goes above $10 will be automatically deactivated. This will prevent traffic sources you don't want from draining your balance while you are away.
Auto-Deactivate by Profit Margin
This option will automatically deactivate traffic sources that are not profitable, starting from the point this feature is activated. In order to use this feature, you will need to setup a tracking pixel.
Once the tracking pixel is setup, you can specify the required profit margin percentage that each traffic source must yield. If a traffic source falls below your profit margin, it will be deactivated. For instance, if your pixel's conversion value is $3.00 and you set the profit margin to 20%, each traffic source then must generate at least $3.60 on every $3 spent otherwise the traffic source will be auto-deactivated.
Please note that all NEW traffic sources will be given the opportunity to earn a profit. If a new traffic source cost exceeds your pixel's conversion price, it will automatically be turned off regardless of your set profit margin.
Disable New Traffic Sources for 24 Hours
This option will stop your campaign from being displayed on ANY new traffic sources for 24 hours. To renew this time, simply turn this feature off then back on again.
CPC Traffic Types
By default, your CPC ad will be displayed on all traffic types. At any time, you can disable any traffic type if you find it to be incompatible with your campaign. Below are the types of monetization tools your CPC ad will receive traffic from. To disable any traffic type, click on the TOGGLE TRAFFIC TYPES yellow button in the upper right corner of the CPC TRAFFIC SOURCES page.
Banner CPC Traffic
Your ad will be displayed next to other ads on over 15 different banner sizes. You will only pay when someone chooses to click your ad among the others displayed.
Interstitial CPC Traffic
An interstitial is a timed ad (typically 6 seconds) that appears after a triggered link is clicked on a website. The visitor will see a list of ads targeted to their device and location and a countdown timer. If the visitor isn't interested in an ad, the interstitial will close.
PushUp Ads CPC Traffic
Push up ads will detect the visitor's location and device, and if it matches your ad's criteria, it will display your ad inside of a prompt. If the visitor clicks OK, they will go to your ad, if they click cancel, they will close the prompt and proceed to the website.
Ad Wall / Content Locker CPC Traffic
The ad wall (also known as a content locker) will detect a website's visitor and location, and if it matches your ad's criteria, it will display your ad amongst other ads that match the same criteria. The visitor will be required to choose only 1 ad to unlock the website they are trying to access. If the visitor chooses your ad, then you will pay your set bid price. This option is considered soft-incentive because the visitor is only asked to interact with 1 ad that they choose by choice from a list. Your ad will NOT be displayed on virtual currency offer walls where users are typically incentivized to complete more than 1 offer.
PopUnder CPC Traffic
When a visitor clicks on a link that triggers a pop under, a pop under will detect a visitors device and location, and if it matches your ad criteria, it will display your ad in a full page format behind the destination webpage of the link. After the visitor closes out the destination webpage, they will see your full page ad.
Noticed an error or an aspect of this post that requires correction? Please provide the post link and reach out to us. We appreciate your feedback and will address the issue promptly.
Check out our latest blog posts:
Tutorials CPAlead
How to Set Up AppsFlyer With CPAlead.com for CPI CampaignsPublished: Feb 19, 2025
Tutorials CPAlead
The Complete Beginner's Guide to Postback Tracking for CPAlead AdvertisersPublished: Jan 24, 2025
Tutorials CPAlead
How to Set Up Postback for CPAlead.com Offerwall: A Simple GuidePublished: Sep 20, 2024
Tutorials CPAlead
A Complete Guide to CPA and CPI Offers: How They Work in Affiliate MarketingPublished: Jun 14, 2024
News CPAlead
Enhancing Your App Store Performance Through Re-engagement of Existing UsersPublished: Feb 26, 2023
News CPAlead
Leveraging CPI Offers for Increased Mobile App Installs: A Comprehensive GuidePublished: Feb 17, 2023
News CPAlead
CPI Offers 101: An Overview of Cost Per Install in the Mobile App IndustryPublished: May 19, 2022


